
EcoSwitch Manual EN v3.8
|
|
|
|
|
|
EcoSwitch Plus UK |
EcoSwitch Plus EU |
EcoSwitch π EU |

Contents
2 Using the EcoSwitch Pi safely
3.1 Installing for the first time
3.2 Reinstalling the EcoSwitch
4 Getting started with the EcoSwitch
4.1 Access the EcoSwitch web interface
4.3 The EcoSwitch Energy Planner
4.4 Switch the EcoSwitch on and off manually
4.5 Change the network name of the EcoSwitch after installation
4.6 Change the EcoSwitch device name
4.7 Change the login credentials of the EcoSwitch
4.8 Install a new version of the firmware
4.8.1 Perform an update in the web interface
4.8.2 Perform an update in the cloud
5 Using the EcoSwitch Energy Planner
5.2 Configure Energy planning based on price data
5.4 Electrical power price data
6.1 Random variation in the planning
7.3 Solar inverter integration
7.3.2 Switching solar inverters
8.1 Connecting the car charger
8.3 Charging based on Battery level
8.5 Charging based on Duration
10 Connection to the Ecosoft server
12.2 Ecosoft Energy App – The menu
12.3 Ecosoft Energy App – My Devices
12.4 Ecosoft Energy App – Hourly Prices
12.5 Ecosoft Energy App – Free Energy Planner
12.6 Ecosoft Energy App – Settings
13.1 EcoSwitch and Home Assistant integration
13.3 Switching currents > 10 A or 12 A
13.4 Access to open-source code
Introduction
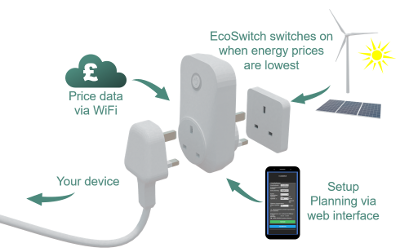
The EcoSwitch is a smart switch you can plug into the wall outlet. Plug the cable of your electrical device into the switch.
The EcoSwitch retrieves energy prices via WiFi from the internet and switches on when the price is lowest. In the web interface you can create a schedule, which determines during which hours (and for how long) the EcoSwitch is allowed to be switched on. The EcoSwitch will then calculate a plan that suits your needs.
You can use this switch for, among others:
• Electrical boilers
• Close-in boilers (kitchen boilers)
• Electrical vehicles and PHEVs
• Waterbeds
• Swimming pools
• Aquaria
Why is the EcoSwitch useful?
Even without reducing your energy consumption, you can reduce greenhouse gas emission if you choose the best moment to use energy. If you have a flexible contract with your energy supplier (when pricing depends on the hour of the day you are consuming energy), you will not only protect the environment, but you will save money as well.
At certain times during the day, there is more electrical power available from sustainable energy sources, for example solar panels and wind turbines. This results in less CO2 emissions per kilowatt hour. If you consume power during those hours, the environment will be taxed less.
EcoSwitch Plus EU
The EcoSwitch Plus EU and EcoSwitch Plus UK can carry up to 10 Amperes. At 230 Volts this is 2300 Watts electrical power of the connected device. It is possible to switch currents greater than 10A, but only indirectly, because 10 A is the maximum for the EcoSwitch. It can be done using an external relay, an electrical contactor.
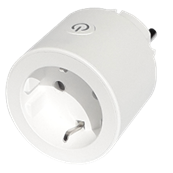
EcoSwitch Plus UK
The EcoSwitch Plus UK is suitable for use in the United Kingdom. EcoSwitch Plus UK can carry up to 10 Amperes. Switching greater currents can be done using an external relay.
It supports current measurement of connected appliance.
EcoSwitch π EU
The EcoSwitch Pi EU can carry up to 12 A. It supports current measurement of connected appliance and readouts of P1 meters, Shelly EM and supported inverters. In addition, the EcoSwitch Pi EU can switch supported inverters.
All information in this document about the EcoSwitch Pi applies to the EU version only.
Using the EcoSwitch Pi safely
The EcoSwitch Pi can handle loads up to 12A safely. To use the EcoSwitch in a safe way, the user should note the following important things.
Connect a maximum of 12 Amperes to the EcoSwitch.
Don’t use an EcoSwitch if the housing is damaged.
Connect the EcoSwitch to a wall socket that is properly and professionally installed.
- Socket with good contacts, installed with 3×2.5 mm2 (VD, VMVK, YMVK, XMVK)
- Use a socket with screw terminals that are tightened firmly during installation.
- Do not connect to a socket with a plug connection
- Do not connect to a socket with a twin cord
- Do not connect to a worn-out socket
- Connect the EcoSwitch to a wall socket only, not to an extension cord
Don’t connect multiple Pi devices to a multiple socket at the same time.
A device connected to the EcoSwitch Pi can only have a good grounding if the socket to which the Pi is connected is also properly grounded. Always use a socket outlet with an earth connection when using an appliance with an earth connection.
Installing the EcoSwitch
Installing for the first time
EcoSwitch can access the internet via your WiFi network to retrieve the current electrical power price data.
The procedure to install the EcoSwitch is this:
- Plug the EcoSwitch into the wall socket.
When the EcoSwitch is used for the first time, it will now become a WiFi Access Point automatically. If you want to make this happen at any other moment, do the following:
- Press the ON/OFF-button (quickly) 6 times. This button has the
 symbol. It is important to do this quickly. If you hear the EcoSwitch switching on or off, it wasn’t fast enough. Please note it has to be exactly 6 times.
 symbol. It is important to do this quickly. If you hear the EcoSwitch switching on or off, it wasn’t fast enough. Please note it has to be exactly 6 times.
When the EcoSwitch has become a temporary WiFi Access Point, a LED will blink, and then you can connect to the switch directly using your mobile phone.
- On your phone, go to the WiFi settings and search for new networks.

- It may take a few seconds up to a couple of minutes before the network called “EcoSwitch” appears in the list. Otherwise, restart the procedure (click the ON/OFF-button 6 times).
- Connect to the network “EcoSwitch”.
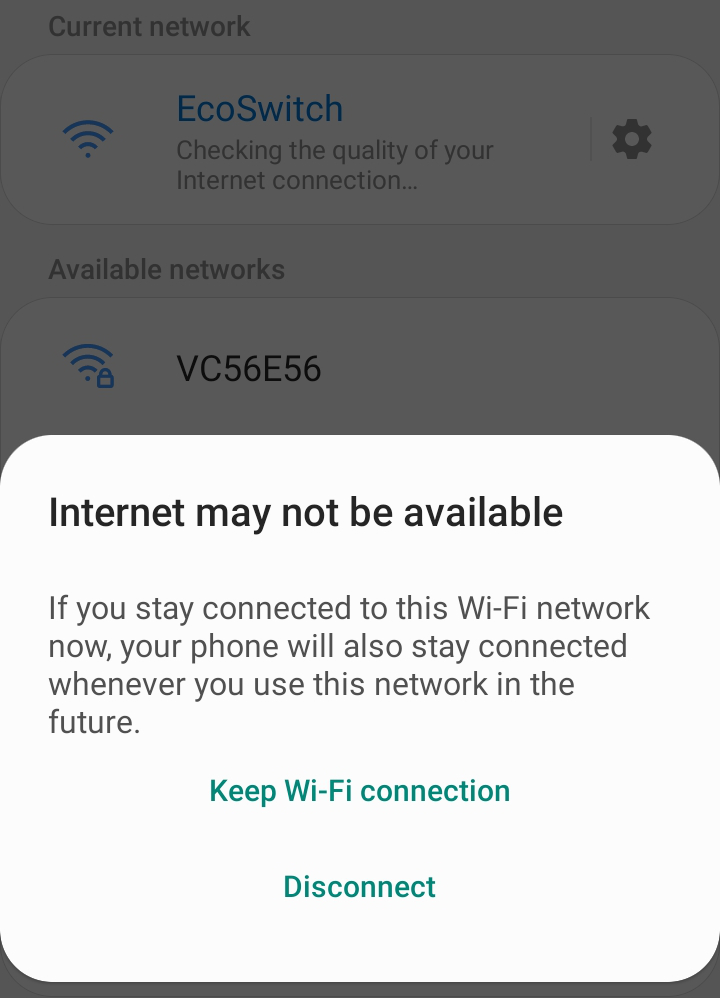
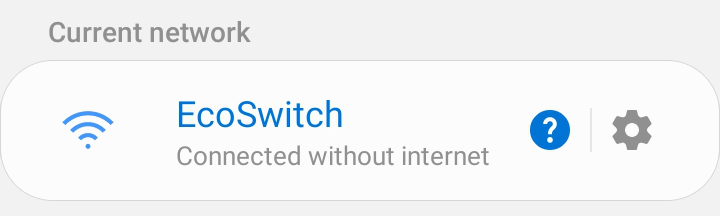
When the connection is established, your phone may warn you that internet is not available. This is normal; choose to keep the WiFi connection. Then your smartphone is connected to the WiFi network with the name “EcoSwitch”.
- In the browser on your phone, go to http://192.168.4.1. This is a temporary address; after configuration the EcoSwitch will no longer be reachable at this address.
- When prompted to log on, use these credentials:
Username = eco
Password = power

- The EcoSwitch shows a list of detected WiFi networks. Select your own WiFi network.
The web page shows:
- WiFi network edit box
- WiFi password edit box
- Hostname edit box
- Save button
- Other buttons (for configuration and reboot)
- Fill in the WiFi password of your WiFi network.
- Optionally, choose a hostname for the EcoSwitch in the network. The default name is “EcoSwitch”.
Note: If you have more than one EcoSwitch devices in your network, it is important to give each of them a unique hostname. You can use this name later to access the switch via the browser or the Ecosoft app.
If the hostname remains “EcoSwitch”, the switch will be accessible via http://ecoswitch.local.
Note: It is not possible to use space or special characters (except the minus sign -) in this name. Suitable hostnames are for example: “showroom3” and “roomsouth” but not “showroom 3” or “room south”.
|
The hostname will be registered via mDNS and is only valid within your network. If your smartphone does not support mDNS you cannot access the EcoSwitch from your smartphone by using an address that ends with .local. In that case, the EcoSwitch is only accessible from your phone via the new IP address that has been assigned to it. On any device supporting mDNS, for example your PC, you can use a .local address to access the EcoSwitch. |
- Press Save
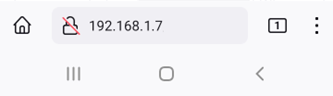
It might take a minute before the EcoSwitch establishes a connection to your WiFi network. When a connection is successfully made, the browser will show you the new IP address that your network has assigned to the EcoSwitch, for example “Redirecting to new IP address 192.168.1.7”. Within a few seconds, the browser will open this address.
Your phone should be reconnected to your own WiFi network; generally this will happen automatically. If the EcoSwitch prompts you to log on again, fill in eco and power, as you did previously.
Maybe the browser cannot establish a connection to the new IP address. Wait a few seconds and try to reload the page. Even after a failed attempt to connect, the browser will probably show the new IP address in the address bar. Use this new IP address to access the EcoSwitch, or use a .local address like (in this example) http://ecoswitch.local.
Reinstalling the EcoSwitch
Did you install the EcoSwitch before and changed the hostname in the mean time? In that case, this is the name that appears on your mobile phone in the list of available networks.
During the first installation, after filling in the username and password to access the EcoSwitch, the web interface of the EcoSwitch will immediately show the list of available networks. During a reinstallation, the web interface will show the main menu instead. In that case, click on “Configuration” and “Configure WiFi” to visit the page showing the available WiFi networks.
Getting started with the EcoSwitch
Access the EcoSwitch web interface
|
Advice: Settings and tools which are not described in this manual shouldn’t be changed or used, because it may cause the system to malfunction. |
 The EcoSwitch is accessible via the assigned IP address or – if your phone supports mDNS – via the hostname of the switch (e.g. http://ecoswitch.local). The IP address may change if your WiFi network assigns another IP address to the switch, for example when the switch has been disconnected from the outlet for some time, and reboots. The hostname however will remain the same, and might be more convenient to use.
When opening the web interface, you will be prompted to log on. The default credentials are:
Username: eco
Password: power
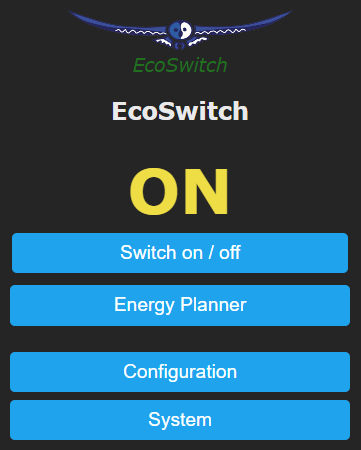
The Main Screen
The Main Screen shows:
Device name: Change this at Main Menu > Configuration > Configure Web Interface
Timestamp: Current date and time
Measuring data: Voltage, current, real power, consumption today, consumption yesterday, total consumption.
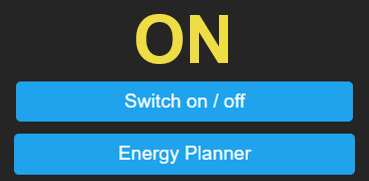
Switch state: ON or OFF
Menu options: Switch on / off, Energy Planner, Configuration, System
The EcoSwitch Energy Planner
 Energy Planning means that the lowest-priced energy will be used during a time block. This time block is specified by start-time and end-time. For example, if the time block is 12 hours and you need energy for 4 hours, the EcoSwitch will be switched on during the cheapest 4 hours within the 12-hour time block.
The EcoSwitch fetches energy price data from our server to determine when consuming power is cheapest. Based on this information the EcoSwitch schedules when to switch on, for example at 12 o’clock.
In the chapter Using the EcoSwitch Energy Planner you can read how to configure it according to your wishes.
Switch the EcoSwitch on and off manually
You can switch the EcoSwitch on and off manually.
Procedure A (in the web interface):
- Log on to the web interface
- The web interface will show if the switch is turned on or not
- Press “Switch on / off” to manually turn the electrical power on or off.
Procedure B (on the device):
- The led is on when the switch is on.
- Click once on the button on the device to switch it on or off.
 button on the device to switch it on or off.
After manually switching the device on or off, the switch will remain in that state (on or off) until the next automatic switching event performed by the built-in Energy Planner.
Option for Manual Switching
You can set up what the EcoSwitch should do when it has been switched manually.
Go to the main menu and click the button “Switch on / off”.

Shown on screen is the default action the EcoSwitch will take after manual switching. In this case the default action is “Reverts to plan” at a certain point, determined by the Energy plan.
It is possible to choose the default action. Click on the “Edit” button. The options will be shown.
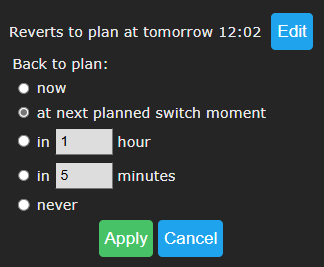
Back to plan:
Now: The EcoSwitch will revert to the plan immediately, and will keep following the plan.
At next planned switch moment: After manually switching (by the user, using a button) the switch will remain on or off, until the next automatic switch action performed by the plan.
In a number of hours: Fill in after how many hours the EcoSwitch should revert to the plan, after a manual switch has taken place. If you choose 1 hour and you switch on the EcoSwitch at 3:44pm, it will remain on at least one hour, this means at least until 4:44pm.
In a number of minutes: Fill in after how many minutes the EcoSwitch should revert to the plan, after a manual switch has taken place. If you choose 5 minutes and you switch on the EcoSwitch at 5:00pm, it will remain on at least five minutes, this means at least until 5:05pm.
Never: The switch will remain on or off. The plan is disabled. Manual switching is possible when this option is used, but the EcoSwitch will not return to the automatic plan.
If you press the button Apply the selected option will be chosen. But if you want to keep the current default action (in this example: Reverts to plan) then click on Cancel.
Note: the options apply to manual switching via the web interface and on the EcoSwitch device itself by pressing the  button.
Change the network name of the EcoSwitch after installation
The network name will determine at which address you can access the switch via a browser.
- Go to the web interface
- Press Configuration
- Press Configure WiFi
- Fill in another Hostname.
- Press Save
Change the EcoSwitch device name
In addition to changing the network name (see previous) you can also change the device name. The device name will be shown at the top of the web interface.
- Press Configure
- Press Configure Other
- Adjust the Device name. Unlike the network name, this device name may contain spaces.
- Press Save
Change the login credentials of the EcoSwitch
|
Note: If you change the password, don’t forget it, or store it somewhere. Without the correct password it is not possible to access the web interface of the EcoSwitch. Hold the button of the EcoSwitch for 40 seconds to reset the WiFi settings and the EcoSwitch password. |
It is recommended to change the default password (power) of the web interface. It is not possible to change the username (eco).
- Press Configuration
- Press Configure Web-Interface (previous name: Other)
- Adjust the Web Admin Password. If you want to make the password visible, tick the checkbox.
- Press Save
Install a new version of the firmware
Perform an update in the web interface
- Go to the web interface of the EcoSwitch
- Press System
- Press Upgrade
On the Update page, the description of the version that is available online will be shown.
Method 1 – Upgrade by web server
- At “Upgrade by web server” you can see which version of the firmware is installed. It shows which version is available online and a list of changes in the firmware.
- Press Start Upgrade.
The latest version will be downloaded and installed by the EcoSwitch.

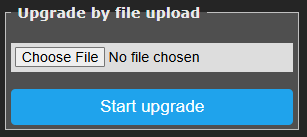
Method 2 – Upgrade by file upload
- Download the latest firmware of the EcoSwitch, for example via the download link shown above.
- At “Upgrade by file upload”, click on “Choose File”.
- Choose the file containing the latest version
- Press Start Upgrade.
Perform an update in the cloud
Update via the cloud is available for the EcoSwitch Pi.

- Make sure the EcoSwitch is paired with the Ecosoft cloud server and this connection is working.
- In the web interface of the EcoSwitch Pi, enable “Perform Actions”.
Every time you wish to update via the cloud, log on to the Ecosoft sever, select the EcoSwitch and click on the “Update” link.

Using the EcoSwitch Energy Planner
Base Configuration
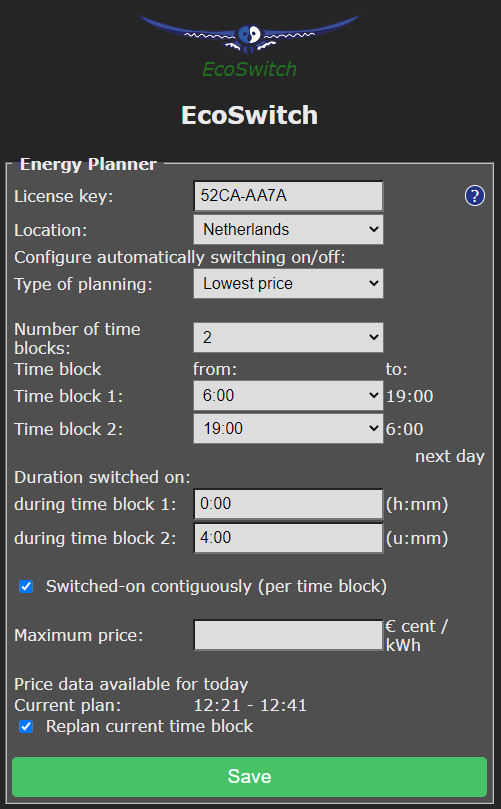
You can access the EcoSwitch Energy Planner via the web interface, by pressing the button “Energy Planner” in the main menu. Then click on the button “Base settings” to access the Base Configuration.
License key: The license key is unique for this specific EcoSwitch. When the key is active, the EcoSwitch can retrieve energy prices from the internet and use them to create plans.
Valid until: The license key is valid until this date. It is possible to buy an extension to the license at the Ecosoft website. Visit https://www.ecosoftenergy.com/licenses/. Fill in your license key at the “checkout” when purchasing an extension to it.

Location
Country: The selected country will be used to retrieve the electricity prices for the country. (Note: After you chose your country and pressed Save at least once, all currency fields will show the currency of your country. For example, at the field “when electricity costs more than”)
Region: Some countries (UK) are divided into different price regions. When you press on “Look up” you are directed to a web page where you can fill in your postal code to find the correct region in the United Kingdom.

Electricity price: Dynamic tariff
The EcoSwitch assumes you have contract with your energy that uses a dynamic tariff, also known as Time of Use (ToU) tariffs, when the prices you pay follow the market. Then the electricity prices are based on wholesale prices excluding of VAT and other surcharges.
Price interval: Select how your energy provider charges you for electricity: Hourly prices or 15-minute prices. For the UK the price interval is half an hour.
Configure Energy planning based on price data
- Go to the web interface of the EcoSwitch
- Click on Energy Planner
- Set Type of Planning to ON at lowest price.
- Fill in the parameters that suit your needs. How to do this will be explained below.
- Press Save
Overview of types of planning:
None: The plan is turned off
ON at lowest price: The EcoSwitch is switched on when the price is the lowest.
OFF at lowest price: Only for special cases. This is a manner of reversed switching, for example to prevent that solar panels feed back electricity to the grid when prices are too low.
Whole day: The EcoSwitch is on or off whole day, depending on the average electricity price during that day.
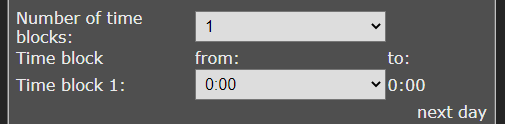
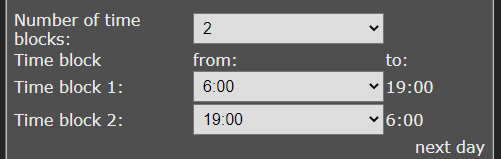
Number of time blocks: Do you want to switch on the EcoSwitch 1x per 24 hours? Leave the number of time blocks at 1. If you want to switch more often during a day, see the section “Configuring Time blocks”.

You can set the length of every time block in minutes. The time blocks add up to exactly 24 hours. For every time block, you can set how long the EcoSwitch should be switch on during that time block: this is the so-called “Duration switched on during time block”.
Duration switched on: Here you can fill in how long the electrical power must be switched on during a time block. For example, if your car’s battery needs a maximum of 4 hours to charge, fill in 4. Then EcoSwitch will (within the time block) switch on power for 4 hours. During the rest of the time (during the time block) the power will be switched off. The power will be switched on during the cheapest hours, based on the available energy price data.
You can fill in the duration in hours or in the format h:mm. For example, if you need one and a half hour of power, fill in 1:30. Fill in 0:15 for a quarter of an hour.

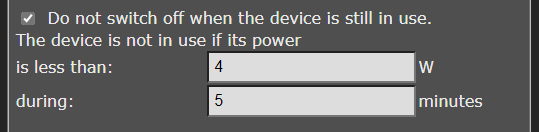
 Do not switch off when the device is still in use:
This option only applies to the EcoSwitch Plus and EcoSwitch Pi (because it relies on power consumption metering).
When it is uncertain for how long electrical power should be supplied to a device, this option can prevent that a device is switched off too early. For example, if a device must be switched on for 2 hours, according to the setup, but after 2 hours it is still consuming energy (for example a laundry machine that is still running), the EcoSwitch will not be switched off when you use this option. The EcoSwitch will only switch off when it has detected that connected device has stopped. To detect of this has happened, the EcoSwitch Plus or EcoSwitch Pi measures the consumed power.
Apart from that, while a device is running, there are sometimes episodes of very low power consumption. During these episodes it should not be switched off. So, the EcoSwitch will consider a device as “not running” if the power is lower than a certain value (in Watts) during a certain time span (in minutes). You can configure these two values as shown below.
 Automatic determination of “Duration switched on”:
This option only applies to the EcoSwitch Plus and EcoSwitch Pi (because it relies on power consumption metering).
When this option is enabled, the EcoSwitch Plus and EcoSwitch Pi will measure how long a device has been used during a time block. Based on that, the EcoSwitch will (for the same time block) adjust the “Duration switched on” automatically to a new value. This is the expected duration that is necessary in the future. This new duration will be applied when the next planning is made (for the same time block). The duration can only be measured after the time block has been completed and there haven’t been any changes made to the settings in the mean time. This option is only available when the option “Do not switch off when the device is still in use” is enabled.
This option may be useful when it is unknown beforehand how long a device needs electrical power. With this option, benefitting from cheap hours will improve, because the “automatic determination” of the real duration creates the possibility to plan more accurately.
Switched-on contiguously (per time block): Prices may vary within a time block, and to benefit from this EcoSwitch may turn on and off multiple times during the time block. This is not always desired, and therefore this option is available. Enable the setting by checking the box.

This may be necessary for your electrical device to work properly. For example, a washing machine probably can’t handle a switch-off during the washing process. For this kind of electrical appliances it is necessary to plan a contiguous period in which power is supplied. In such cases, the option has to be enabled by checking the box.
On the other hand, heating a waterbed or the charging a battery may work fine if power is supplied with one or more breaks in between.
If power is not necessarily supplied contiguously, you can benefit more lower energy prices.
So, if your electrical devices can handle it, it might be good to leave this option disabled.
Maximum price: If you don’t want to pay more for electrical energy than a certain amount of money, fill in this amount in the “Maximum price” edit box. The EcoSwitch compares the electrical energy price of a specific hour, exclusive of VAT and other surcharges, to the amount you fill in here. The amount should be in Eurocents per kilo watt hour. For example, if you fill in 25, the EcoSwitch will be switched off if the price is more than 25 eurocents per kWh. The consequence of this setting can be that the switch is not switched on at all during a certain time block.

If you fill in a maximum price of € 0,25 and the energy prices is € 0,251, the EcoSwitch will not switch because € 0,251 is above the maximum. Some websites (and other sources) round off energy prices to whole cents. So € 0,251 will be represented as € 0,25. Do you want the EcoSwitch in this case to switch at a price of € 0,251? Increase the maximum price to e.g. € 0,254.
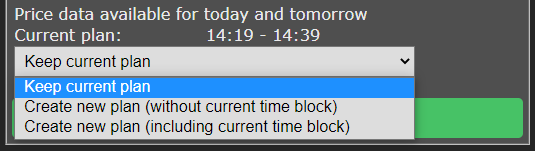
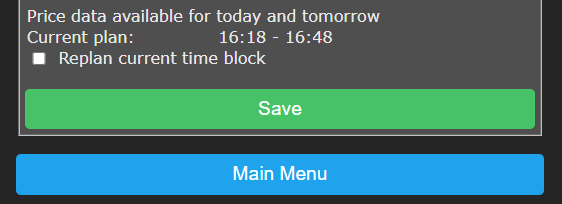
Current plan: The actual current plan is shown here. The plan holds the exact times when the switch will be switch on and off. There can be a series of on- and off times, when you allow the EcoSwitch to switch on and off during a time block multiple times. The planning for the next time block will be made just before these next time block starts, and is not visible yet.
Applying New options is discussed at the end of this chapter.
Configuring time blocks
On default there is one time block of 24 hours, from 0:00 to 0:00 the next day. In many occasions, one time block is enough. If you’re satisfied with that, you can skip configuring time blocks.
Example: charging the battery of an electric car
Assume you want to charge the battery of your electric vehicle, at home. You arrive before 19:00h and leave the next day after 6:00h. The charging therefore should take place between 19:00 and 6:00.
Set the Number of time blocks to 2.
1. from 06:00 to 19:00
2. from 19:00 to 06:00 the next day
Assume that charging the vehicle takes 4 hours. In the EcoSwitch settings, we call this “Duration switched on”.
At “Duration switched on” you can fill in a duration for each time block. In the first time block the car is not present. The duration is 0. For the second time block, fill in 4 hours. Like this:
During time block 1: 0:00
During time block 2: 4:00
Example: switching on a device three times per day
Let’s assume you divide the 24 hours in three parts of equal length. In each part (of 8 hours) you want to EcoSwitch to be switched on for 30 minutes, when energy prices are lowest.
In that case, configure 3 time blocks (0-8, 8-16, 16-0):
1. from 00:00 to 08:00
2. from 08:00 to 16:00
3. from 16:00 to 00:00 the next day.
At “Duration switched on ” fill in 0:30 for each time block. Like this:
During time block 1: 0:30
During time block 2: 0:30
During time block 3: 0:30
Maximum number of six time blocks
The maximum number of time blocks you can use is 6. Currently, it is only possible to specify whole hours to set the start times and end times of time blocks. (Durations however can be specified in minutes.)
Note:
Make sure that a time block that extends into the next day (for example from 16:00 to 5:00) always starts after 14:00. This is because the energy prices of the next day will be available after 14:00. If a time block starts after 14:00, the EcoSwitch will have the prices of the next day at its disposal, and will be able to create a correct plan or schedule.
Electrical power price data
The EcoSwitch can assist you to use power when the energy price is lowest. The energy prices vary per day and hour, depending on the weather (solar radiation and wind) and other circumstances. The switch retrieves the expected energy prices from the Ecosoft server, to create a power consumption plan based on these numbers. If this server cannot be reached, or if the price data is unavailable for another reason, the average values will be used, based on historical price data. In that case, an optimal planning is not possible. Therefore it is important that the switch can connect to the Ecosoft server via a WiFi connection.
In the web interface of the EcoSwitch you can see if price data has been retrieved from the Ecosoft server. Press Energy Planner.
In the Energy Planner you will see the price data is available, for example “Price data available for today and tomorrow”.
Apply new options
You can choose when, after you changed the options of the Energy, the new options should be applied.

You can choose “Apply immediately” and “Apply next time block” for the dropdown menu.
Additional configuration
Random variation in the planning
The EcoSwitch planner will add (or subtract) a random variation of a few minutes to the start times and end times of the plan. As a result, electrical power will be consumed a little earlier or later. This is to prevent the switch to behave too predictable, and a number of switches to switch too synchronously.
The variation of the planning is configurable. Click on the Configuration button at the bottom of the Energy Planner.

You will reach the following page:
Plan variability: On default the variation in the planning is 300 seconds (5 minutes). This is the maximum variation that can be applied. It means that a random number will be chosen between 0 and 300 seconds, and the planning will be adjusted with this number.
Duration:
Same duration: In default, the variation does not influence the duration. The plan will only be moved forwards or backwards in time (for example 08:02 – 09:02). This way it is possible that the plan will end up partially in another hour, having another electricity price. Therefore the EcoSwitch offers to other types of variation.
Shortened duration: With this setting, the planned will be shortened randomly (for example 08:02 – 8:48). Even when applying variation, this can be a way to make sure that the planned duration will remain within the boundaries of the cheapest hours.
Extended duration: With this setting, the planned will be extended randomly (for example 07:58 – 9:02). This option can be useful when the option “OFF at lowest price” is used. This is to make sure the complete time block (in this example 8am to 9am) when the electricity price is too low, is completely covered by the plan. Application of this is switching solar panels.
Apply new options
You can choose when, after you changed the options of the Energy, the new options should be applied.

You can choose “Apply immediately” and “Apply next time block” for the dropdown menu.
External connections
 The EcoSwitch Pi is able to read data from external power consumption meters, in order to switch a connected device or a relay based on this data. For example, a connected PV system can be switched off when electrical energy is feeding back to the grid, or when solar panels are producing much electricity at a given moment.
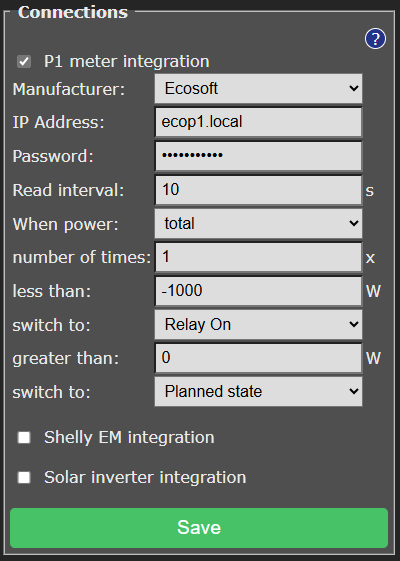
In the main menu, click on “Energy Planner”. Then click on “Connections”.
P1 meter integration
P1-meter integration: When a smart meter in the meter cupboard is equipped with a P1-port, you can connect a P1-meter to it. The P1-meter reads energy consumption data from this port and sends it to the EcoSwitch Pi via the network.
The EcoSwitch Pi reads metering data from the Ecosoft P1-meter and the HomeWizard P1-meter.
IP Address: Fill in the IP address or network name of the P1-meter. The default name of the Ecosoft P1-meter is ecop1.local.
Password: Password configured at the Ecosoft P1-meter.
Read interval: Time elapse (in seconds) between two data readouts.
When power: Choose the value the EcoSwitch Pi should respond to: total, usage phase 1, usage phase 2, usage phase 3, return phase 1, return phase 2, or return phase 3.
Number of times: The EcoSwitch Pi counts the number of readouts in a row that a condition (e.g. total power is less than -1000 W) is met. When the number of times is set to 5, the condition has to be met 5 times in a row before the EcoSwitch Pi performs a “switch to” action.
When power less than/ greater than: Fill in below/above which measured power (in Watts) an action should be taken (e.g. switching the relay, or returning to the Energy plan).
For example, if you want to switch the relay if more than 1 kW is fed back to the grid, choose: When power is less than -1000 W, switch to “Relay On”. When power is greater than (e.g.) 0 W, switch back to “Planned state”.
Switch to: The options are: Planned state, Relay Off, Relay On.
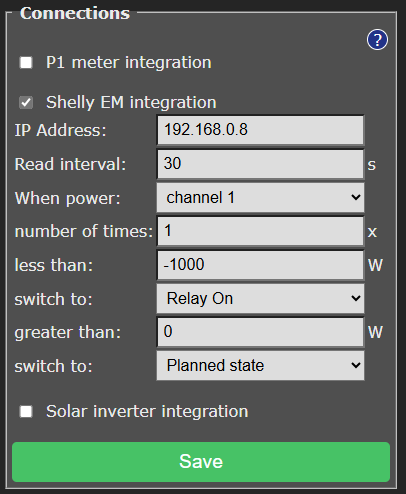
Shelly EM integration
With a Shelly EM it is possible to measure the electrical power on a wire. The EcoSwitch receives this data from the Shelly EM.
IP Address: Fill in the local IP address of the Shelly EM. The Shelly web interface is running at this IP as well.
Read interval: Time elapse (in seconds) between two data readouts.
When power: A Shelly EM can measure the energy consumption from one or more channels. Fill in to which channel the EcoSwitch Pi should respond to.
Number of times: The EcoSwitch Pi counts the number of readouts in a row that a condition (e.g. power channel 1 is less than 180 W) is met. When the number of times is set to 5, the condition has to be met 5 times in a row before the EcoSwitch Pi performs a “switch to” action.
(When power) less than: The EcoSwitch Pi switches when the power at the specified channel becomes less than a certain amount of Watts.
(Then) switch to: Choose one of the following options: Planned state, Relay Off, Relay On.
When you choose “Planned state” the EcoSwitch Pi will return to the planned state.
(When power) greater than: The EcoSwitch should switch when the power at the specified channel is greater than a certain amount of Watts.
(Then) Switch to: Choose one of the following options: Planned state, Relay Off, Relay On.
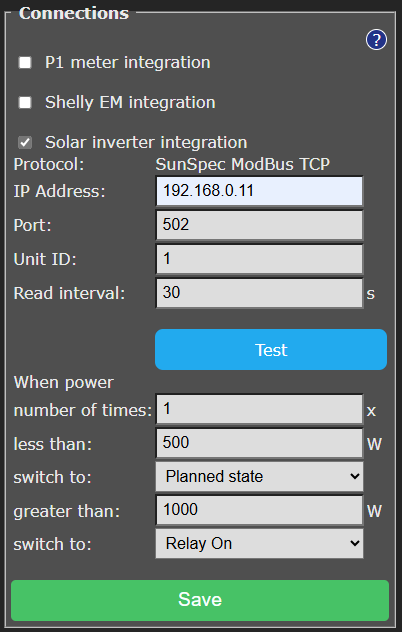
Solar inverter integration
Reading inverter data
Security Warning about Modbus TCP
Modbus TCP communication is not secured. Other devices in the same network may be able to send messages via Modbus TCP, and by doing so control or read out devices. When Modbus TCP is used anyway, make sure there are no untrusted devices present on the same network (including IoT devices connected to the WiFi network), or implement data separation by connecting devices that need to communicate via Modbus TCP to a separate network.
Protocol: The EcoSwitch Pi can read data from a solar energy inverter supporting the SunSpec Modbus TCP protocol. This communication can take place entirely within your own network. If necessary, ask your technician to activate Modbus TCP on your inverter, and ask which IP address and port are available. The default port is 502; SolarEdge usually uses port 1502.
IP address: IP address of the inverter
Port: TCP port of the inverter used for the communication
Unit ID: Unit ID used for communication, for example 126 for SMA devices.
Press “Save”. To examine if the inverter is read correctly, click on the Test button. This way you can view the power consumption value that has been read, and determine if an error occurred.
Read interval: Time elapse (in seconds) between two data readouts.
Test Button: After saving the settings once, the test button will appear to test the connection to the inverter.
Number of times: The EcoSwitch Pi counts the number of readouts in a row that a condition (e.g. power is less than 500 W) is met. When the number of times is set to 5, the condition has to be met 5 times in a row before the EcoSwitch Pi performs a “switch to” action.
When power less than/ greater than:
To switch the heat pump to a higher state if more than 1000 W is produced by the solar panels, configure:
When power is smaller than (e.g.) 500 W, switch back to Planned state, and if greater than 1000 W, switch to Relay On.

Switching solar inverters
For some inverters, the produced power of the inverter can be set to zero by the EcoSwitch Pi when the price is below a certain value. This can be used to prevent that costs are charged to you for feeding back electrical power to the grid.
See: https://www.ecosoftenergy.com/inverters/
If the EcoSwitch Pi detects a supported inverter, the corresponding settings to switch the solar system appear at “Solar inverter integration”, accessible via Main Menu -> Energy Planner -> Connections.
Charging a car battery
Connecting the car charger
 In some cases the EcoSwitch Pi can charge the battery of an electric car. The maximum current flowing through the EcoSwitch Pi is 12 Amps. For higher currents, switching a battery is only possible indirectly. To do so, connect a contactor between the EcoSwitch and the car battery. Then EcoSwitch will switch the external relay and not be a part of the high current circuit.
Go to the Energy Planner and set Type of planning to “Car charger”.
Click on the button “Charge car” in the main menu.
Car battery configuration
Go to the Car Charge page and click on the Configuration button.
Battery capacity: the capacity of the car battery in kWh. This value is used to create a charging plan based on the Battery level.
Charging speed: The charging speed of the car battery in kW. This value is used among others to determine if a charging plan can be completed on time.
Wiring: Directly or External Relay. When the battery is connected to the EcoSwitch Pi directly, the current will flow through the EcoSwitch Pi, which can calculate the charging speed in this case, which can help to create a cost effective charging plan. Measuring the consumed power is not possible when an external relay is connected between the EcoSwitch Pi and the car charger. If this is the case, choose “External Relay”.
Charging based on Battery level
There are three ways to create a car charging plan, each with its own settings visible on its own tab: Battery Level, Energy (kWh) and Duration.
Click on the Battery button with the green battery symbol.
Current battery level: level of the car battery in percentage. Zero percent is completely discharged.
Desired battery level: level of the battery that should be reached in the charging session in percentage. 100% is fully charged.
When ready: Specify when the charging session should be completed. The plan will adjust itself to this value and calculate if it is possible to be accomplished on time. Choose Input manually from the drop down menu to specify a day (today, tomorrow or day after tomorrow) and a time. The drop down menu also features easy presets to choose from, such as: today 17:00, tomorrow 7:00, within 4 hours.
Apply: Press this button to create the charging plan for the car battery. The created plan will be show on the screen. The plan takes energy prices into account.
Energy to charge: The difference (in kWh) between the desired level and the current level. To calculate this value, the desired increase (percentage divided by 100) is multiplied by the battery capacity (kWh) filled in at car charge “Configuration”.
Current plan: A list of all switching events of the plan. If a plan is not possible in the given time, a notification will appear.
After applying a car charging plan, press the Cancel button to return to the car charging settings if you want to create a new plan.
Charging based on Energy
Click on the Energy button with the Energy symbol.

Energy to charge: The energy that must be used during the charge session in kWh.
When ready: Specify when the charging session should be completed. Input manually or choose an easy presets, such as: today 17:00, tomorrow 7:00, within 4 hours.
Apply: Press this button to create the charging plan for the car battery.
After applying a car charging plan, press the Cancel button to return to the car charging settings if you want to create a new plan.
Charging based on Duration
Press the Duration button with the stopwatch symbol.
Charge duration: Input manually or choose one of the presets like half an hour, 1 hour, 2 hours.
When ready: Specify when the charging session should be completed. The plan will adjust itself to this value and calculate if it is possible to accomplish. Choose Input manually from the drop down menu to specify a day (today, tomorrow or day after tomorrow) and a time. The drop down menu also features easy presets to choose from, such as: today 17:00, tomorrow 7:00, within 4 hours.
Apply: Press this button to create the charging plan for the car battery. The created plan will be show on the screen. The plan takes energy prices into account.
After applying a car charging plan, press the Cancel button to return to the car charging settings if you want to create a new plan.
Information Pages
Events
The EcoSwitch registers switch-on and switch-off events, and when the energy plan is adjusted. To view this information, go to the main menu, choose System and then choose Events.
On default, the most recent events will be at the top. Use the arrow buttons to browse to next or previous events.
The list shows by whom the switch has been operated: by the user (via the web interface or via the button on the device itself) or by the automated Energy Planner.
Energy Consumption Metering
This option only applies to the EcoSwitch Plus and EcoSwitch Pi (because it relies on power consumption metering).
 The EcoSwitch Plus and EcoSwitch Pi record how much power has been consumed. To view this information in detail, choose System from the main menu, and then Energy Use.

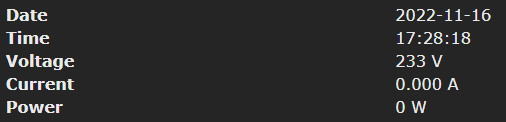
At the top of the page the current time is displayed, together with the current Voltage, Current and Power. When the switch is turned off, nothing will be measured. The power consumption in kWh is displayed as well.

Note: these measurements are not suitable for billing purposes or any comparable ends.

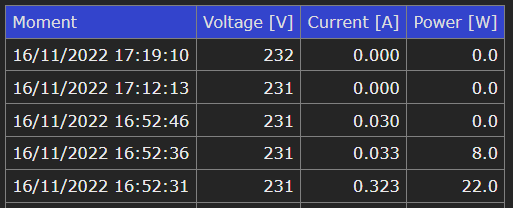
In the second part of the screen a table is displayed, showing the history of the collected energy data. To save space, only significant changes are recorded and displayed. This means that there has not been detected any significant change in current or power from a certain recorded moment to the next recorded moment. To create this table, measurements are made every 5 seconds.
Use the arrow buttons to browse to next or previous moments.
Connection to the Ecosoft server
Introduction
Optionally, data collected by the EcoSwitch can be stored on the Ecosoft server in the cloud. The server stores data for a long period of time, and will be accessible by you from outside your own network.
Additionally, you can perform remote actions. Connecting to the Ecosoft server is optional and not necessary for the EcoSwitch to work properly.
Pairing the EcoSwitch to the cloud is not required to receive energy prices. The EcoSwitch can operate without this connection.
Access and use of the server is possible with a valid license key which is stored on the device (Ecosoft EcoSwitch) itself. The license key can be extended when needed.
In the cloud, graphs can be viewed about among others:
Switching states of the EcoSwitch (on and off)
The corresponding energy prices
Power consumption metering (EcoSwitch Plus and Pi)
Note: If an EcoSwitch has been disconnected from the network for some time, the connection to the cloud server may not work properly. If this is the case, go to the web interface of the EcoSwitch, unpair the device and pair it again (at the same screen).
Connecting the EcoSwitch
The Ecosoft server has the following web address:
https://cloud.ecosoftenergie.nl
You’ll need an account at the server to start using it. Then you can connect one or more devices to your account.

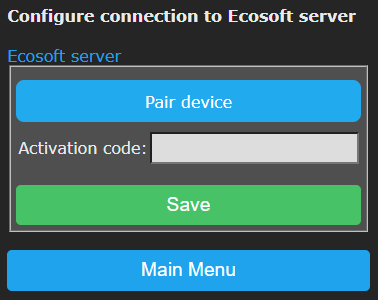
To connect an EcoSwitch to your account:
• Open the web interface of the device itself (the EcoSwitch)
• Click on Configuration
• Click on Configure Cloud
• Click on the button “Pair device”

The browser will open a new window or tab, and will direct you to the server at cloud.ecosoftenergie.nl. The URL includes the ID of the device to connect it more easily.
• Create an account or sign in to the server. When necessary, change the language at the server by clicking on the globe.

• Click on the Confirm button for confirmation
• Click on Register to add the device to your account
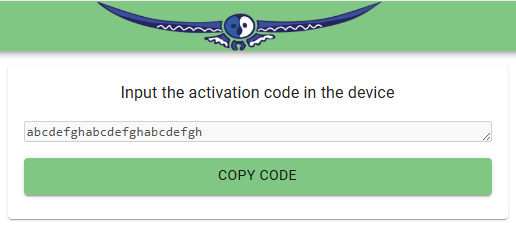
• Copy the activation code

• Return to the window or tab of the EcoSwitch, paste the activation code in the edit box, and click on Save.
When the connection is made, you can choose which data should be sent to the server:
• Power consumption: Amount of electrical power (in Watts) consumed with time stamps. This is available for all devices measuring power consumption: among others EcoSwitch Plus, EcoSwitch Pi, Ecosoft P1-meter.
• Events: For example, switch on and switch off events.
• Perform actions: Enable this option to allow remote control of the EcoSwitch via the server. Available actions are e.g. remotely switch the EcoSwitch on and off, and remotely make adjustments to the Energy Plan.
The data is sent periodically (not real-time). Especially when the connection has just been initiated, it may take a while before all data has been sent. Expect actions will be performed with a delay, after 5 minutes at most.
Stop sending data
You can stop sending data at any time via the web interface of the EcoSwitch. You can do this by disabling the options (untick the boxes) or by disconnecting the EcoSwitch from the Ecosoft server. Sending data will then be stopped. Disconnecting does not remove data from the server, but will stop sending data.
Remove data from server
Note: Removal of data from the server is possible at the server itself, via the “Delete Device” button on the EcoSwitch page at the server.
Accessing data and graphs
The data is presented in graphs. Open https://cloud.ecosoftenergie.nl in your browser and sign on, or access it via the web interface of the EcoSwitch: click on Cloud Connections and click on the link “Device at Ecosoft server”.
In the Ecosoft Dashboard, click on the icon of the EcoSwitch and then on the Power Consumption tab.

The graphs show energy price data as well.
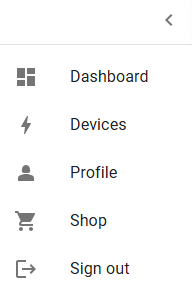
Ecosoft Server Menu
The Ecosoft cloud server has a number of menu items in the pane on the left: Dashboard, Devices, Profile, Shop, and Sign out.

Ecosoft Server Dashboard
Reach the Dashboard from the left menu. It has three parts:
- Devices overview
- Graph – Electricity prices
- Graph – Gas prices
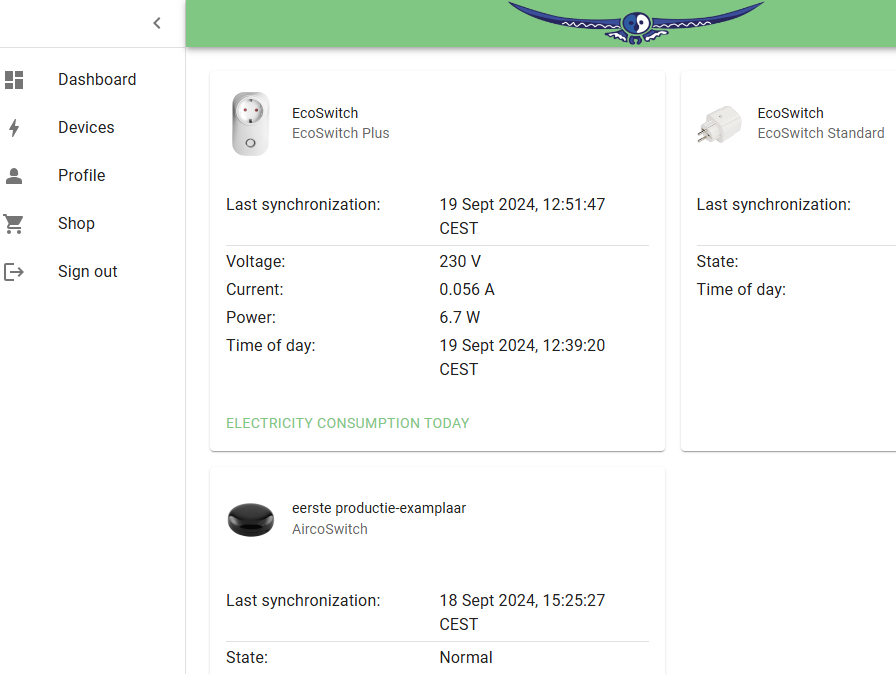
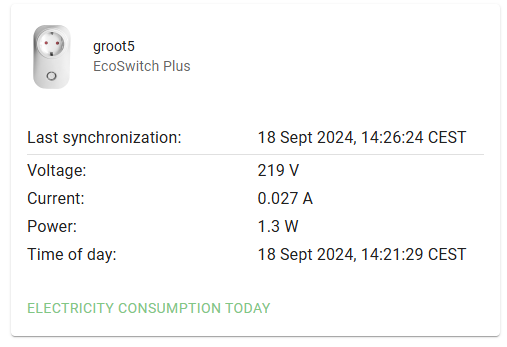
 Every connected device has its own “card” or “Device Summary” on this page.
It shows the date and time of the last synchronization (between device and server), metering data (voltage, current, power) and time of day (when the measurement actually took place).
Click on “Electricity Consumption today” to view today’s totals for electricity consumption, actual costs, costs with average price and achieved savings.
Graphs of electricity and gas prices are also shown on the Dashboard.
Access to the EcoSwitch page at the server
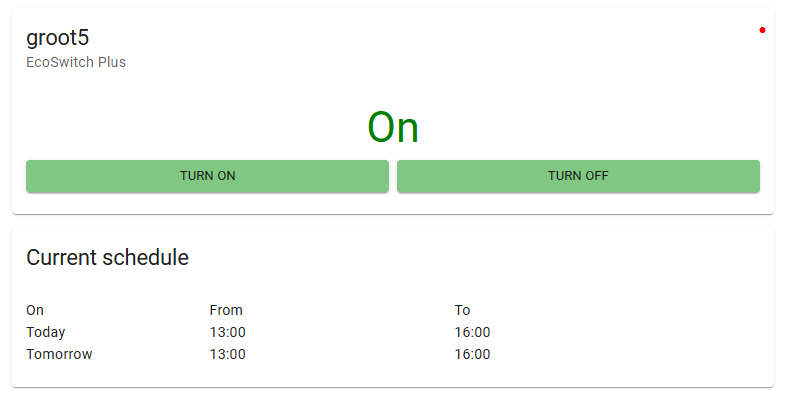
Click on Dashboard, find the “information box” of the EcoSwitch and click on it. You’ll go to the EcoSwitch device page where you can adjust more settings and view details. This device page has a few tabs:
- Overview
- Power Consumption
- Events
- Settings
Note: If it is not possible to view or change specific things, then grant permission via the web interface of the device. See the first paragraph of this chapter.
The “Overview” tab shows information on the Ecosoft device
- State of the device: on, off, low, high, etc.
- Buttons for remote switching of the device
- Current Schedule: Overview of performed and planned automated switch events.
- Settings: Change the device name here. This name will be shown in the Dashboard and Devices List.
- Service: Shows the number of days of service with the current license. License extensions are available on the website.
- Last synchronization: Timestamp of time and date of the most recent moment the device sent data to the server. The device only sends something when there is actually new data to send. Therefore this moment may be behind the current date and time.
- Voltage: measured power in Volts.
- Current: measured current in Amperes.
- Power: measured power in Watts.
- Time of day: Timestamp of the measurement. This is not the same as the timestamp of the sending of the data.
- Delete Device: Button to remove the device from the account completely. All data sent by the device will be deleted from the server. Synchronization will be stopped. When you wish, you can go to the web interface of the device and connect it to the server again, and send the available data from the device to the server again.

TAB – Power Consumption
The tab “Power Consumption” shows a number of graphs.
For these graphs, you can check or uncheck the boxes “VAT” and “other taxes”. The “Today” button sends you to today’s graph. You can choose another date as well.
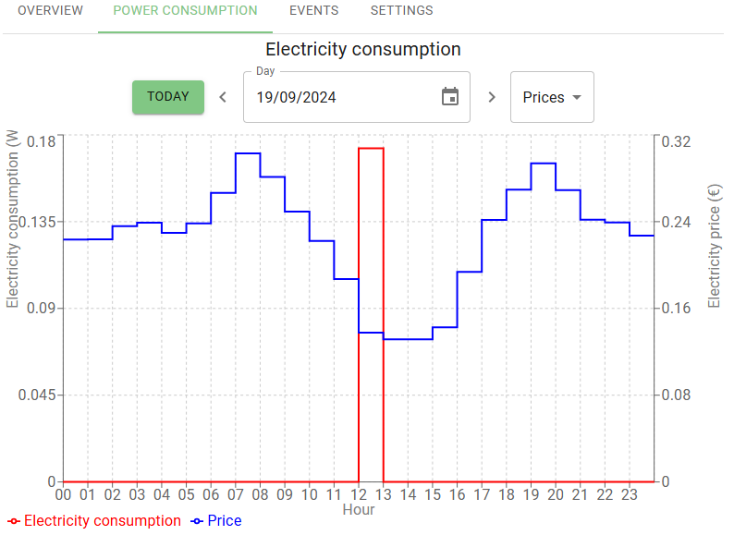
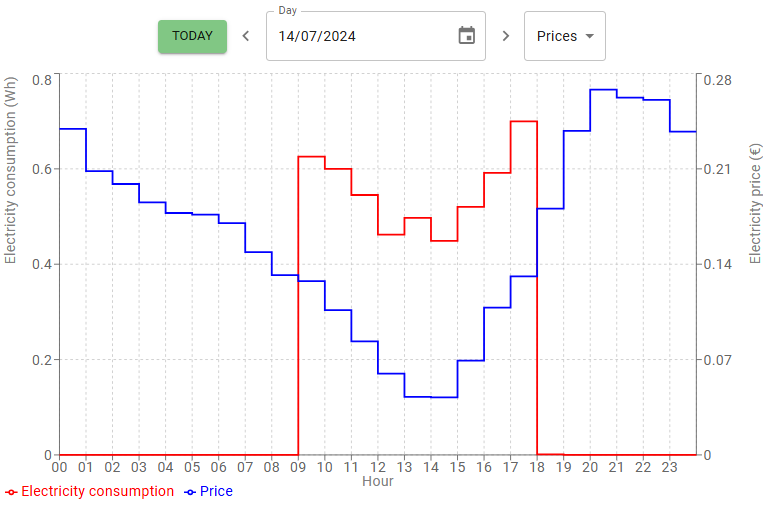
Graph 1 – Power Consumption – One day
The first graph shows the power consumption in Watts (red line) by the device and the energy prices (blue line).
From the dropdown menu, choose Costs (in stead of Prices) to see the costs per hour.
Right below is the link “Total Electricity consumption this day”. Click on this link to view how much electricity has been used by this EcoSwitch on the selected date and what the costs were. It also shows the average costs (you would have paid when having consumed power at random hours) and the amount you have saved by switching smart using the EcoSwitch.
In this example, the EcoSwitch only consumed power (red line) during the nine hours when electricity prices (blue line) were lowest. See the graph below.

Graph 2 – Power – One day
The second graph shows the measured electric power in Watts (red) and the electricity prices (blue).
From the dropdown menu, choose State (instead of Power) to see the state the device was in: on, off, low, normal, boost, max.
Graph 3 – Power Consumption – one week or month
The third is a bar graph showing electricity consumption (red) and costs (blue). On default is one week. Change this to one month in the dropdown menu above the graph. You can select another week or month as well.
TAB – Events
This tab shows actions that have been performed on the device, and the source of the actions.

Events are for example:
- Switch on, Switch off
Sources are among others:
- User (cloud): via Ecosoft server
- User (web): via web interface of the Ecosoft device
- Energy Plan
- Restart
These events are the same as found in the web interface of the EcoSwitch itself, at System > Events.
TAB – Settings
In the tab “Settings” you can adjust settings, which are adjustable in the web interface of the Ecosoft device as well. See chapter “Using the EcoSwitch Energy Planner” for an explanation.
Which settings are available depends on the type of device. For the EcoSwitch Plus for example: Country, Type of planning, Time-block settings, “Do not switch off when the device is in use”, Maximum price, etc.
Ecosoft Server Devices
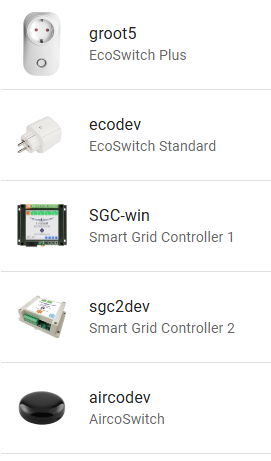
Click on Devices in the left menu. This page shows a list of connected Ecosoft devices. Click on a device to go to the page of the device, where detailed information and adjustable settings are available.

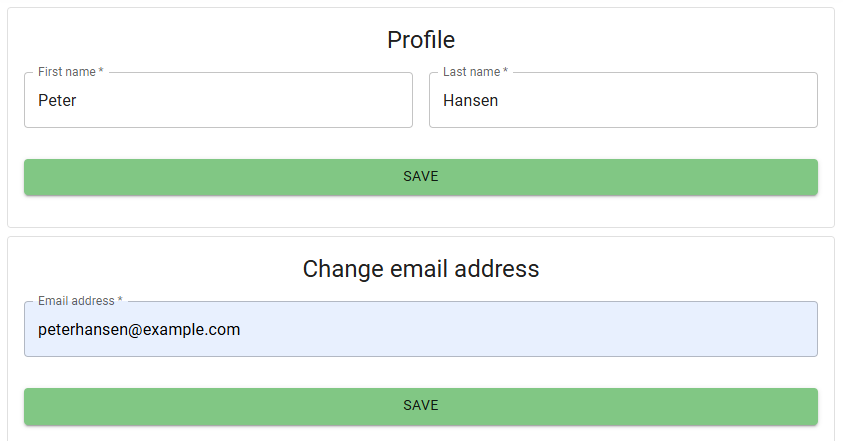
Ecosoft Server Profile
Click on Profile in the left menu to set personal data, including First name, Last name, Email address, and Password.

It is possible to delete the account with the button below.

Ecosoft Shop
Menu item Shop in the left menu is a link to the Ecosoft Energy Shop. You can purchase Ecosoft devices and licenses there.
Ecosoft Server Sign Out
Click on Sign Out in the left menu to sign out.
Problem Solving
The EcoSwitch is not accessible in the network
Check if WiFi is still working and its signal is strong enough at the site where the EcoSwitch is located. To reset the WiFi settings of the EcoSwitch, please follow the installation procedure (press the ON/OFF-button 6x times) as described in Installing the EcoSwitch.
Reset the EcoSwitch password
Hold the button of the EcoSwitch for 40 seconds to reset the WiFi settings and the EcoSwitch password.
The EcoSwitch doesn’t respond to the ON/OFF-button anymore
Unplug the EcoSwitch from the socket, and plug it in again. If the device still doesn’t respond, it is probably defective.
The LED of the EcoSwitch is blinking. What does that mean?
A blinking LED means that the EcoSwitch is attempting to connect to the WiFi network.
It may also indicate that the EcoSwitch has become a WiFi Access Point. If that is the case you can connect directly to the switch to set up the network configuration. (This is used during installation. After installation, the switch is accessible via your WiFi network.)
Extend the license
Extending an EcoSwitch license is possible at https://www.ecosoftenergy.com/licenses/
Ecosoft Energy app
Introduction
The EcoSwitch can be operated from any smart phone with a web browser, like iPhones and Android phones.
The free Ecosoft Energy App is optional. With this app you can:
● View the current energy prices
● Choose the best moment to consume energy
● Configure and operate all EcoSwitches in your network
 The Ecosoft Energy App is available for Android and iPhone.
For Android phones (Google Play): https://play.google.com/store/apps/details?id=nl.vidicode.ecosoftenergieplanner
 For iPhones (App Store):
https://apps.apple.com/nl/app/ecosoft-energie/id6463721887?platform=iphone
Ecosoft Energy App – The menu
 The menu options of the app are:
My Devices
A handy tool to configure all your Ecosoft devices, including the EcoSwitch, at one spot. (Note: You can also access an Ecosoft device using a web browser. Then you will also have access to the full functionality of the Ecosoft devices.)
Hourly Prices
History of the hourly tariffs
Free Energy Planner
You can use the planner to find the best moment to consume electrical power, even if you don’t have an EcoSwitch.
Dynamic rates
About the dynamic energy contract, which is necessary to benefit from price fluctuations.
More information
This button links to https://www.ecosoftenergy.com
Ecosoft Energy App – My Devices
The “My devices” page is a folder with icons to access all your Ecosoft Devices. The app can store network addresses and passwords (optional) for quick access.
Note: You can also access your Ecosoft devices via a web browser without using the app.

 Add an Ecosoft device to the app
On the My devices page you will find a list of all Ecosoft devices your app has access to.
Install the EcoSwitch as described in the chapter “Install”. Check if the EcoSwitch is accessible via the network address and if the username and password are correct.
Then add the EcoSwitch to the Devices list of the app. Press the + symbol. Then you can fill in the following information of the switch:

● Device name
● Network address
● Username
● Password
If you fill in the username and password here, the app will log on automatically to the EcoSwitch you click (or press) on.
When the list is completed, you can manage all EcoSwitches at your location via the app.
Accessing an EcoSwitch via the app
Press on the icon of the EcoSwitch to go to the web interface of the switch. In this web interface, you can adjust the planning of the switch and change other settings of the switch.
If you don’t have the Ecosoft Energy app, you can access the switch via a web browser.
Ecosoft Energy App – Hourly Prices

View the current energy prices here, at Hourly Prices.
Energy prices are fluctuating constantly. Every day your Ecosoft devices receive new prices. Here you view this data yourself.
Ecosoft Energy App – Free Energy Planner
The Free Energy Planner is also available at https://www.ecosoftenergy.com/energieplanner/
If you don’t have an EcoSwitch, this Free Energy Planner is an alternative to determine when the energy price is lowest. The result is valid for today. (An EcoSwitch can automatically calculate this daily, and switch on and off your electrical device automatically.)
The settings of the Free Energy Planner are:
● For how long do you need to use power?
● When must power usage be finished?
● With what time steps can you delay the start of your device?
The time-step option is used this way: If an electrical device supports a delayed start, let’s say a delay of 0:15 and multiples of 0:15, set the time-step to 0:15. Is a delay of multiples of 1 hour supported? Set the time-step to 1 hour.
 After you complete the setup, the result will show.
The dark green or even red bar shows the costs when you don’t plan at all, but start to consume energy right away. The light green bar shows the costs when you follow the advice of the Free Energy Planner. It will also show the percentage of the price you save.
With this tool you can reduce costs and CO2 emission right away.
Ecosoft Energy App – Settings

 In the Ecosoft Energy app, click on the cog wheel in the upper right corner to access the settings of the app. (These settings apply to the app only, not to the Ecosoft devices.)
Language: English or Dutch.
Country: Netherlands, Belgium, Germany or United Kingdom.
Local Access: Open in app, Open in external browser.
Note: Local access is via network names or IPs of the devices.
Remote Access: Open in app, Open in external browser.
Note: Remote access is via cloud.ecosoftenergie.nl
Authentication: Yes, No.
The authentication to access the app is the same as used to unlock your phone.
Other information
EcoSwitch and Home Assistant integration
The integration is via the MQTT protocol.
• The software version of the EcoSwitch should be 1.8.1 or higher:
• Check the current version with via System > Information
• When necessary, update the software via System > Update
• In the EcoSwitch, turn on MQTT, as follows:
• System > Consoles > Console
• Enter the command: SetOption3 1
• The switch reboots.
• In the EcoSwitch, configure MQTT via menu Configuration > Configure MQTT
• In Home Assistant, add MQTT integration:
https://www.home-assistant.io/integrations/mqtt/
• Add Tasmota integration to Home Assistant:
https://my.home-assistant.io/redirect/config_flow_start/?domain=Tasmota
The EcoSwitch will appear as a Tasmota device.
For the standard EcoSwitch, the image of a single switch will appear.
If you click on this image, the EcoSwitch switches on or off.
For the EcoSwitch Plus, additional data about power consumption will be visible.
This data refreshes every few minutes.
Home Assistant offers the possibility to create rules. For example it is possible to switch another device when the EcoSwitch switches.
• Browse to the EcoSwitch device, and click on the + sign at Automations
• Choose: “Do something when EcoSwitch turns on”.
• At Actions, add that another device (that is connected to Home Assistant) should be switched on.
By doing this, the time schedule (based on energy prices) made by the EcoSwitch, will be applied to the other device (even if they are not physically connected to each other).
Built-in power limiter
EcoSwitch Plus
 Since version 1.9.1 the EcoSwitch Plus has a built-in power limiter at 2760 Watts. At 230 Volts this equals to 12 Amperes. When the consumed power is above this limit for a few seconds, the EcoSwitch Plus will switch off. The EcoSwitch will remain switched off for 60 seconds. Then the switch will try again. It will try again five times at most. The EcoSwitch Plus can carry a maximum of 10 Amperes (2300 Watts).
 EcoSwitch Pi
The EcoSwitch Pi EU has a built-in power limiter at 2990 Watts. At 230 Volts this equals to 13 Amperes. When the consumed power is above this limit for a few seconds, the EcoSwitch Pi EU will switch off. The EcoSwitch will remain switched off for 60 seconds. Then the switch will try again. It will try again five times at most. The EcoSwitch Pi EU can carry a maximum of 12 Ampere (2760 Watts).
Switching currents > 10 A or 12 A
It is possible to switch currents greater than 10A or 12 A, but only indirectly, because 10 A is the maximum for the EcoSwitch Basis, EcoSwitch Plus EU, and EcoSwitch Plus UK, while 12 A is the maximum for the EcoSwitch Pi EU. Switching higher currents can be done using an external relay, an electrical contactor.
In that case the EcoSwitch operates the contactor, and the contactor switches the circuit with the higher current (e.g. 16A). With a suitable contactor, switching three-phase electrical circuits is possible as well.
Installation work – possibly by an electrician – would be required to install the contactor.
Access to open-source code
The EcoSwitch uses open source programs. If you want access to the source code, you may send a request to Ecosoft.
English EcoSwitch manual version 3.8