
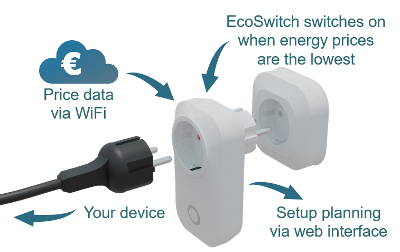
The EcoSwitch 10A is a switch you can plug into the wall outlet. Plug the cable of your electrical device into the switch. The EcoSwitch fetches energy prices via WiFi from the internet and switches on when the price is lowest. In the web interface you can create a schedule, which determines during which hours (and for how long) the EcoSwitch is allowed to be switched on. The EcoSwitch will then calculate a plan that suits your needs.
You can reach the best results when you have a flexible contract with your energy supplier (full flex energy contract).
Installing the EcoSwitch
• On your smartphone, temporarily turn off mobile data before you start the installation procedure.
• If installation does not succeed using an Apple device (iPhone or iPad), you can try using an Android device instead. After a successful installation using Android, you can use your Apple device to reach the EcoSwitch.
The procedure to install the EcoSwitch is this:
• Plug the EcoSwitch into the wall socket.
When you start using the EcoSwitch for the first time, it will automatically become a WiFi Access Point. If you want to make the EcoSwitch a WiFi Access Point at any given moment, then do the following:
• Press the ON/OFF-button (quickly) 6 times. The EcoSwitch will become a temporary WiFi Access Point.
You can perform the next steps of the installation on your mobile phone:
- On your phone, go to the WiFi settings and search for new networks.
- Connect to the network called “EcoSwitch”. It may take a few seconds up to a couple of minutes before this network appears in the list. Otherwise, restart the procedure (click the ON/OFF-button 6 times). When the connection is established, your phone may warn you that internet is not available. This is normal; choose to keep the WiFi connection.
- In the browser on your phone, go to http://192.168.4.1. This is a temporary address; after configuration the EcoSwitch will no longer be reachable at this address.
- When prompted to log on, use these credentials:
Username = eco
Password = power - The EcoSwitch shows a list of detected WiFi networks. Select your own WiFi network and fill in the WiFi password that belongs to it.
- Optionally, choose a hostname for the EcoSwitch in the network. The default name is “EcoSwitch”. If you have more than one EcoSwitch devices in your network, it is important to give each of them a unique name. This name you can use later to access the switch via the browser. If the name remains “EcoSwitch”, the switch will be accessible via http://ecoswitch.local.
- Press Save.
- It might take a minute before the EcoSwitch establishes a connection to your WiFi network. When a connection is successfully made, the browser will show you the new IP address that your network has assigned to the EcoSwitch. Within a few seconds, the browser will open this address.
- Your phone should be reconnected to your own WiFi network; generally this will happen automatically. If the EcoSwitch prompts you to log on again, fill in eco and power, as you did previously.
- If the EcoSwitch page doesn’t open or the page doesn’t prompt you to log on, you can try to reload the page. As an alternative you can access the switch via http://ecoswitch.local or the new IP address.
Configure the Energy Planner based on price data
Energy Planning means that the lowest-priced energy will be used during a time block (specified by start-time and end-time). For example, if the time block is 12 hours and you need energy for 4 hours, the EcoSwitch will be switched on during the cheapest 4 hours within the 12-hour time block.
● Go to the web interface of the EcoSwitch
Note: You can use names like “my_kitchen_ecoswitch.local”, but .local names will only work from phones and PCs supporting mDNS. If this name doesn’t give you access, use the IP address of the switch instead.
● Press Energy Planner

● Set Type of Planning to Lowest Price

● Choose the parameters that suit your energy needs. See the examples below on how to do this.
● Press Save
Energy Planner Example
If you want to switch on the EcoSwitch for 30 minutes during a day (24 hours), you can do this:
● Set Type of Planning to Lowest Price
● Leave the number of time blocks at the default (one time block per 24 hours).
● Fill in 0:30 at “Duration switched on during time block 1”.
● Press Save.
Energy Planner example with a close in boiler (kitchen boiler)
This example shows you how to use more than one time block.
Let’s say the boiler is only used two times a day for hot water, in the morning at about 7 am and in the afternoon at about 7 pm. In this case, we set up two time blocks. Set the number of time blocks to 2.
Fill in the Time block 1 and Time block 2 fields. The first runs from 7:00 to 19:00 and the second from 19:00 to 7:00 the next day.
Let’s say heating the tap water in the boiler takes 2 hours at maximum. In the planner we call this Duration. For both time blocks, fill in a duration of 2 hours.
The page of the Energy Planner looks like this:
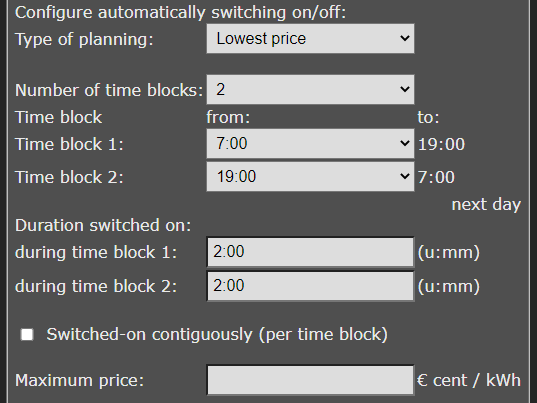
The EcoSwitch will be switched on during the 2 cheapest hours of each time block.
You can configure up to 6 time blocks. When there is a time block that runs into the next day (for example from 16:00 to 5:00), make sure this time block always starts after 14:00. This is recommended because the newest energy prices become available not earlier than 14:00.
It is important that the EcoSwitch is able to connect (via WiFi) to the Ecosoft server, to regularly fetch energy prices. If this server cannot be reached, or if the price data is unavailable for another reason, the average values will be used, based on historical price data.
You can switch on/off the EcoSwitch manually with the physical button or via the menu in the web browser. After doing so, the switch will remain in this state until the next automatic action (switch on or switch off) performed by the Energy Planner.
Extra option for the EcoSwitch Plus
The EcoSwitch Plus is able to detect the power that is consumed by the connected device. Therefore the option “Do not switch off when the device is still in use” is available. When you use this option, the EcoSwitch Plus will only switch off after the connected device has been stopped.